May 20, 2017

5. Operating the Electric Motors

Transistor-based DC Motor Control


The best way to work with the DC motors is to use a specialized Motor Shield.

At first - we did not have it. But still, we were desperately eager to try our new chassis in action.

We were lucky - while building our starting kit, we took a couple of NPN transistors 2N2222A. Here and here we found a nice and short explanation how to use a transistor to control high currents of the DC motors without the risk to damage the Arduino board.
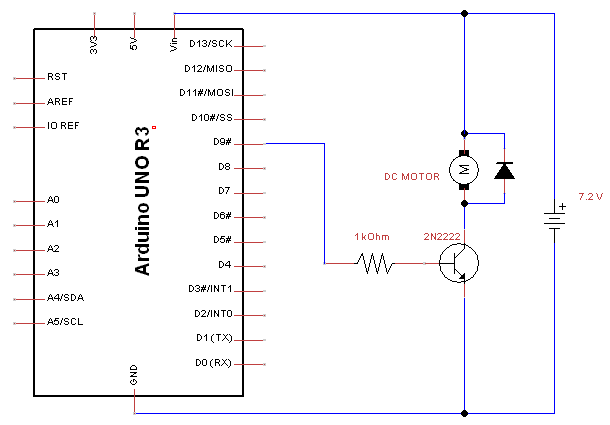
DC motor control using NPN transistor

May 14, 2017

4. Arduino MEGA 2560

WHY?


The grandiosity of the plans we have for our mighty robot raised some concerns. Can a single Arduino UNO carry on all the tasks we expect? At that time we did not trust much the wires-saving technologies like I2C or SPI. So we thought, first of all, we will quickly run out of available Arduino ports.

May 11, 2017

3. Chassis Selection

The Plan


Preparation steps may take a lot of time. I and my son spent more than two months learning the basics and running small experiments with Arduino. We used a custom-built starting kit, passed a couple of beginners ramp-up courses, played with Arduino board, sensors, LED and electric motors driven by transistors. Ultimately, we figured out what can we expect from the Arduino-based robot, and what kind of the tasks it can perform.

We decided to build a rather big robot which should be able to wander around the rooms. It needs to be capable going over 5 cm (2 inches)  doorsteps (because that is the height of the doorsteps in our house. Also, the robot must be stable and capable of wearing lots of sensors, a video camera or a cell phone, and/or some small TFT screen. Imagination instantly paints some caterpillar-chassis robot 10 cm high and 20x20 cm long and wide (~4x8x8 inches).