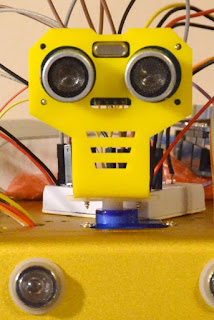
A major part of the modern electronic devices glamour comes from the calm inhuman glow of the LED's carefully embedded into their bodies.
Our robot is not an exception. Adding just couple simple LEDs, changed its appearance radically. Let's see what resources the robotics designers can tap into, and bring more light into their projects.
A step by step guide for the beginners on robotics, Arduino and electronics
December 18, 2017
August 30, 2017
12. Better Remote Control with FPV
Making Things Complicated
In one of the previous posts, we explained the initial version of the remote control system, implemented for our robot. It was based on a simple protocol and used RoboRemo application as a remote control user interface.The simplicity of the solution posed some limits on the functions. At some point, we decided to make a step forward and implement a more complicated remote control version.
Mainly - we were looking for:
- FPV (First Person View) - the possibility to see the real-time video from the camera installed at the robot
- Usage of joystick or steering wheel to control the robot
- Having a big dashboard with many small controls which can operate numerous features of the robot and indicate on the screen the real status which is based on telemetry
- Possibility to see all the traffic between the robot and the remote control application, having the possibility to type commands manually
Labels:
AI,
ESP13,
FPV,
Java,
MEGA,
multitasking,
programming,
RoboRemoteFPV,
Serial,
training,
WiFi
August 1, 2017
11. Infrared Distance Sensors
How it works
Facing the insufficiency of the ultrasonic distance sensors for the autonomous navigation, we arrived at the next stop - infrared distance sensors.The plan was to build kind of sensors array formed by the numerous distance sensors facing in different directions and saving the robot at least from hitting the obstacles in front and falling down from the height. These sensors must be inexpensive both in terms of money and energy consumption.
Soon we found an interesting option, surprisingly named "Infrared Obstacle Avoidance Sensor for Arduino Robot" - it is precisely what we need!
July 19, 2017
10. Ultrasonic Distance Sensor
How it works
It is time to teach our robot navigating autonomously around the room. Some time ago we installed Ultrasonic Distance Sensor HC-SR04 with the mounting bracket. But up to this point, it was used just as a nice decoration.
June 15, 2017
9. WiFi Remote Control
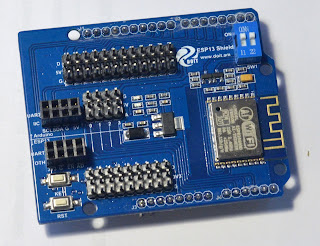
Finally, we found some time to play with the ESP13 board. After a deeper investigation - this module proved to be a very self-sustaining and robust shield which grants the limitless access to the WiFi connection for any Arduino projects.
Labels:
books,
components,
electronics,
ESP13,
ESP8266,
MEGA,
programming,
RoboRemo,
Serial,
UNO,
WiFi
June 10, 2017
8. Software Architecture and Multitasking
In the previous posts, you might notice that as the code of the robot was growing, we started grouping related pieces into separate files and tried to make these pieces as independent as possible.
Now it is time to give some explanations, why that was done, and how can we ensure timely reaction to the outside events, having that many things to do on such a simplistic board as Arduino UNO/MEGA.
Now it is time to give some explanations, why that was done, and how can we ensure timely reaction to the outside events, having that many things to do on such a simplistic board as Arduino UNO/MEGA.
June 4, 2017
7. Sounds Generation
Our robot learned how to crawl. Now it is time to give it a voice. It is obvious that even well-known R2D2 became famous also because of his magnificent trills and beeps. Our robot cannot miss this part.
There are lots of inexpensive sound generation modules which can be integrated with Arduino. Including even modules which can play MP3 files from the built-in micro-SD card.
Currently, we have nothing like that. But still, there is a way do beep.
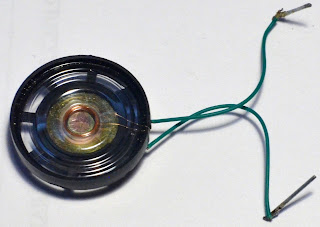
From the old broken toy we extracted a beeper - I believe in any house with kids you can find a couple.
June 2, 2017
6. Power for the Robot
The fіrst prototype
While working with the introductory Arduino experiments, it is unlikely you face any concerns on how to power your circuits. Usually, your board receives all it need through the USB connection from the computer. For the sophisticated experiments you can even buy a breadboard with the power supply module (like this one).
Talking about the autonomous robot - it starts to be a bit more complicated. You can't rely on external power, and you need to find the way to have everything on board.
May 20, 2017
5. Operating the Electric Motors
Transistor-based DC Motor Control
The best way to work with the DC motors is to use a specialized Motor Shield.
At first - we did not have it. But still, we were desperately eager to try our new chassis in action.
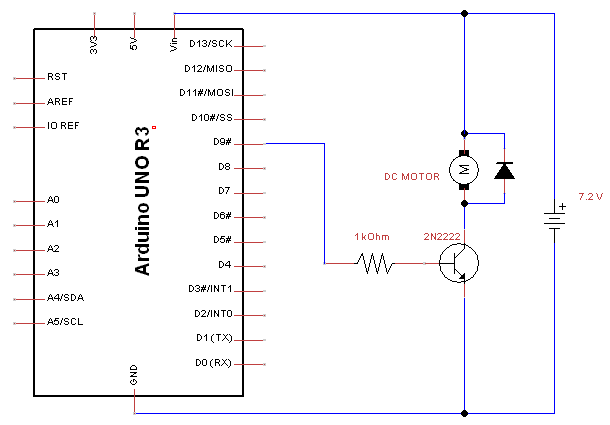
We were lucky - while building our starting kit, we took a couple of NPN transistors 2N2222A. Here and here we found a nice and short explanation how to use a transistor to control high currents of the DC motors without the risk to damage the Arduino board.
May 14, 2017
4. Arduino MEGA 2560
WHY?
The grandiosity of the plans we have for our mighty robot raised some concerns. Can a single Arduino UNO carry on all the tasks we expect? At that time we did not trust much the wires-saving technologies like I2C or SPI. So we thought, first of all, we will quickly run out of available Arduino ports.
May 11, 2017
3. Chassis Selection
The Plan
Preparation steps may take a lot of time. I and my son spent more than two months learning the basics and running small experiments with Arduino. We used a custom-built starting kit, passed a couple of beginners ramp-up courses, played with Arduino board, sensors, LED and electric motors driven by transistors. Ultimately, we figured out what can we expect from the Arduino-based robot, and what kind of the tasks it can perform.
We decided to build a rather big robot which should be able to wander around the rooms. It needs to be capable going over 5 cm (2 inches) doorsteps (because that is the height of the doorsteps in our house. Also, the robot must be stable and capable of wearing lots of sensors, a video camera or a cell phone, and/or some small TFT screen. Imagination instantly paints some caterpillar-chassis robot 10 cm high and 20x20 cm long and wide (~4x8x8 inches).
April 17, 2017
2. Dive into the Arduino Programming
Too many choices - too many decisions
The openness of the Arduino platform gives the unprecedented flexibility. Anyone can find own combination of tools and approaches which fit best his or her level and preferences. This also brings some complexity. Usually, it is hard to find information about all available options in a single place. So, for most of us, it takes many trial and error attempts. If the "errors" path is too long - it gets harder and harder to stay motivated and keep going.
We are not going to provide a training here - there are lots of specialized resources which do this much better. Our goal is to make your learning path as short as possible and gain enough knowledge to understand and enjoy the next steps in our robot building challenge.
Labels:
Ardublock,
Arduino,
books,
c++,
Eclipse,
forums,
gcc,
IDE,
programming,
Scratch,
Sloeber,
starter kit
April 5, 2017
1. Dive into Electronics
Required Knowledge
Nowadays the entry barrier for robotics is not high. To start building some simple robots it is sufficient to know the very basic electricity principles, have the preliminary idea about how to use a computer, how to browse the Internet and work with documents.You won't even need any soldering skills!
Still - any kind of extra knowledge will be extremely helpful for you. If you are keen to take your robotics hobby seriously but feel the lack of the core knowledge - consider participating in the basic online training like this one: Khan Academy: Electrical Engineering. The foundation Programming training can also be helpful.
April 2, 2017
0. Introductions
A while ago, me and my 10-years old son fell in love with the idea of building robots and implementing some electronics tricks to amuse ourselves and amaze others. Of course, our ambitions did not reach the level of constructing smart and autonomous Boston Dynamics-like beasts. We would like to create something small and friendly which will be wandering around our house and play soccer with our cat.
First, our imagination painted some noble and intelligent robot like the famous R2D2.
First, our imagination painted some noble and intelligent robot like the famous R2D2.
Subscribe to:
Posts (Atom)


