There are lots of inexpensive sound generation modules which can be integrated with Arduino. Including even modules which can play MP3 files from the built-in micro-SD card.
Currently, we have nothing like that. But still, there is a way do beep.
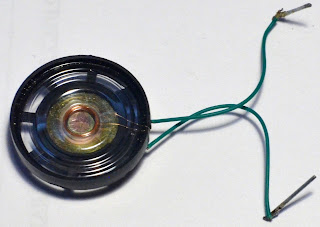
From the old broken toy we extracted a beeper - I believe in any house with kids you can find a couple.
To the wires, we soldered two pins made from the used sparkler stiff wire. So now it is convenient to connect the beeper to the breadboard or Arduino sockets. Later we'll wrap the connection points with the heat-shrink tube.
Now we need to make the beeper vibrate and generate something audible. Arduino itself does not have the capability to generate sound signals (I mean nice sine-like fluctuations in the frequencies range perceptible to the human ear). The only way to generate something similar is to use a side effect of the Pulse-width Modulation (PWM) which is used by Arduino "for getting analog results with digital means".
The idea of PWM is that instead of building complicated circuits to reduce the output voltage gradually, the device generates 5-volt pulses making them longer (wider) or shorter, depending on the desired "analog" level. So if you need to set 5 V - the width of the pulse is infinite. If you need something like 4 V - you keep 80% of some period output of 5 V, and 20% of that period - 0 V. If you need output like 2.5 V - you set the width of the 5 V pulse to 50%, and the remaining 50% keep 0 V as the output.
This means when you set some level at the output with the analogWrite(), you technically generate fluctuations of different frequency which will cause the beeper to generate some sound. Of course, that sound will be very mechanical and metallic, but, well, that the kind of the voice you expect from the real robot!
Arduino provides a nice library Tone, which allows you to send to the specified PWM pin a sound signal of some frequency. Just specify a call like this:
tone(<PWM pin#>, <frequency>) ;
For example:
tone(9, 440) ; // beep the musical note A
We connected our beeper to one of the Motor Shield servo sockets (because our Motor Shield is installed on top of the Arduino board and covers all its sockets). Fortunately, for the sake of simplicity, the manufacturer of the Motor Shield just connected Arduino pins #9 and #10 to the servo controlling pins (adding there also 5 V power and GND lines). We plugged our beeper to the servo control and the GND pins and it works perfectly well.
There are 2 issues you can face when using Tone library:
- Usage of the musical notes or frequencies is not convenient to generate a robot voice. You will have to store huge arrays of the short duration notes.
- Use of the Tone library harms PWM functionality at the pins #3 and #11.
- Greetings
- Agreement
- Question
- Scare
Here is how it sounds like:
The core of the library is very compact and is based on two functions which we just copypasted to our code.
The full listing of the sample program is below. Beep at will!
// store the pin# where the beeper is connected to
int voicePin = 9;

void setup() {
    pinMode(voicePin, OUTPUT);
// Hello!
    playTone(1600,100);
    playTone(2600,24);
    playTone(1900,92);
    delay(4);
    playFreqGlissando(2500, 3600, 1, 1900);
    playFreqGlissando(3600, 4200, 1, 1900);
    playFreqGlissando(4200, 3600, 1, 1900);
    playFreqGlissando(3600, 1900, 1, 1900);
    playFreqGlissando(550, 750, 1, 500);
    playFreqGlissando(750, 1200, 1, 500);
    playFreqGlissando(1200, 2000, 1, 500);
    playFreqGlissando(2000, 2100, 1, 300);
    delay(32);
    playTone(2350,36);
    playFreqGlissando(2350, 1600, 1, 500);
    delay(1000);
// OK
    playFreqGlissando(2300, 1900, 1, 1100);
    delay(28);
    playFreqGlissando(1800, 1700, 1, 1000);
    delay(36);
    playFreqGlissando(2000, 2200, 1, 1100);
    delay(1000);
// Question
    playTone(2400,40);
    playTone(1000,32);
    delay(28);
    playFreqGlissando(1700, 2400, 1, 1000);
    playTone(2400,32);
    delay(28);
    playFreqGlissando(2200, 1700, 1, 800);
    playTone(1700,24);
    delay(28);
    playFreqGlissando(1900, 2700, 1, 800);
    playTone(2700,21);
    delay(28);
    playFreqGlissando(2200, 1700, 1, 800);
    playTone(1700,24);
    delay(28);
    playFreqGlissando(1900, 2700, 1, 800);
    playTone(2700,21);
    delay(1000);
// Scare
    playFreqGlissando(400, 550, 1, 14000);
    playFreqGlissando(550, 400, 1, 1200);
    playTone(2400,36);
    playFreqGlissando(1800, 2400, 1, 700);
    playTone(2400,36);
    delay(32);
    playFreqGlissando(2200, 1800, 1, 700);
    playFreqGlissando(1800, 1750, 1, 900);
    playTone(2350,36);
    playFreqGlissando(2350, 1200, 1, 700);
    delay(32);
    playFreqGlissando(700, 600, 1, 300);
    playFreqGlissando(600, 750, 1, 900);
}

void playTone(unsigned int toneFrequency, byte beats) {
//recalculate frequency to pause value between pulses
    int tone = (1000000 / toneFrequency)/2;
    for (long i = 0; i < beats * 1000L; i += tone * 2) {
        digitalWrite(voicePin, HIGH);
        delayMicroseconds(tone);
        digitalWrite(voicePin, LOW);
        delayMicroseconds(tone);
    }
}

void playFreqGlissando( float freqFrom, float freqTo,
                        float duty, float duration ) {
 duration=duration/8*3;
    int stepLength = 20; //30
    int i, numberOfSteps;
    float freqStep, freq;
    numberOfSteps  =  duration/stepLength;
    freqStep =  (freqTo - freqFrom)/numberOfSteps;
    freq = freqFrom;
    for ( i=0; i < numberOfSteps; i++ ) {
        playTone(freq, duty);
        freq = freq  + freqStep ;
    }
    playTone(freqTo, stepLength);
}
void loop() {
}
The final sound generation code is available at Github: https://github.com/rmaryan/ardurobot/blob/ardurobot-1.3/RobotVoice.cpp. We wrapped it into a class and integrated with our "multitasking" approach.


No comments:
Post a Comment