How it works
Facing the insufficiency of the ultrasonic distance sensors for the autonomous navigation, we arrived at the next stop - infrared distance sensors.The plan was to build kind of sensors array formed by the numerous distance sensors facing in different directions and saving the robot at least from hitting the obstacles in front and falling down from the height. These sensors must be inexpensive both in terms of money and energy consumption.
Soon we found an interesting option, surprisingly named "Infrared Obstacle Avoidance Sensor for Arduino Robot" - it is precisely what we need!
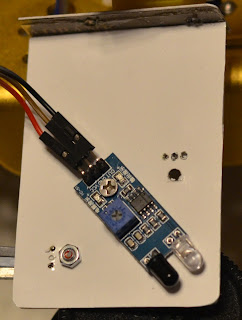
For just ~70 cents you can get a reliable and easy to operate module. Two pins are used to get the power (VCC and GND). The third pin (OUT) is set by the sensor to the high-voltage level if it sees something in front and low-voltage level if no obstacle detected. The obstacle detection range can be adjusted by a built-in potentiometer.
There are also two LED's on the board. One indicates if the board is powered on. The other indicates if the sensor detected any obstacle. These LED's make the calibration process way easier.
Experiments have shown that these sensors can successfully work close to each other, still to increase the reliability it is recommended to separate them with something opaque if they are too close to each other.
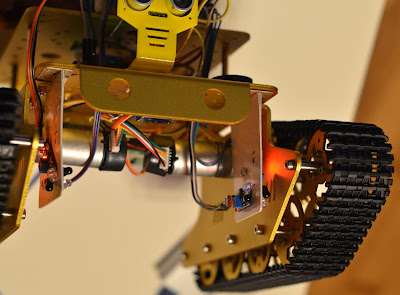
For a start we decided to install 4 sensors:
- two are forward-facing - detecting any obstacles in front
- two more are down-facing - detecting the edge of the deep abyss which can potentially be harmful to the robot
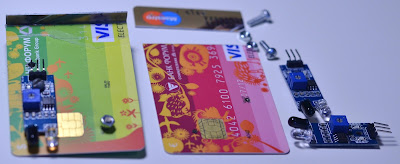
The robot chassis was not designed to hold sensors like that. So we had to build special consoles. Old credit cards, pieces of the transparent plastic boxes and some glue are great materials for the structures of this kind.
It took couple iterations of cutting and adjusting before we figured out the right size for the console.
To make the consoles look nicer - we decorated them with the white adhesive contact paper.
All the perforations for the bolts were done by the heated up pin. You can use any source of heat for this (open fire, heat gun or even a soldering iron). Never use the soldering iron tip to burn the holes in the plastic - this is the best way to kill it.
Sensors are bolted to the consoles and additionally stuck on the double-sided adhesive tape. We also made three small perforations under the sensor's connector pins - securing the sensor position even more.
Overall everything worked perfectly well. Consoles protect the sensors from direct hits from the obstacles. Also, they isolate closely located sensors from interference.
The first sensors test almost led to a catastrophe.
Initially, we placed the abyss detectors precisely vertically. Thus the robot was seeing the edge too late, and the navigation program had no chance to stop the motors timely and escape.
Thus we had to burn new perforations and rotate the abyss detection sensors to look more to the front. This position allows the earlier abyss detection and gives enough time for the software to react.
Having the sensors and the consoles finally installed on the robot, you should calibrate the sensor's sensitivity. Adjust the potentiometers and use the built-in LED's to make sure the sensors detect obstacles at the desired distance.
Detecting the edge of the abyss
The most important part of the robot's autonomous navigation is ensuring it is safe for the human beings (remember the Asimov's Three Laws of Robotics?). Under no conditions, a big robot like ours should fall from any height. So the edge of the abyss detection was the first task we started working on.Usually when your robot is running forward and approaching a deadly abyss - the task of stopping it and escaping the danger is quite urgent. Precisely for such cases, Arduino has a special interrupts mechanism.
As soon as any sensor detects some danger, the regular execution of the robot's program is interrupted at the hardware level and the AI module immediately receives a notification about the emergency.
If you are not quite sure how the interrupts work, before moving forward please watch the corresponding series of the Jeremy Blum's tutorial.
All the interrupts handling code is located in the file robot.ino.
First of all - let's define which Arduino pins will be used for the edge detection sensors:
const uint8_t ABYSS_RIGHT_PIN = 20;// right sensor uses pin #20
const uint8_t ABYSS_LEFT_PIN = 21; // left sensor uses pin #21
These pin numbers are chosen for a reason. According to the official documentation - Arduino MEGA 2560 support interrupts only on the pins ##2, 3, 18, 19, 20 and 21.
Next step - register the function abyssDetected() as the sensors interrupt handler. To find the proper interrupt number which is attached to the corresponding Arduino pin, it is safer to use function digitalPinToInterrupt() from the standard Arduino library.
So the registration code looks like the following:
attachInterrupt(digitalPinToInterrupt(ABYSS_LEFT_PIN),
                  abyssDetected, FALLING);
attachInterrupt(digitalPinToInterrupt(ABYSS_RIGHT_PIN),
                  abyssDetected, FALLING);
As soon as the voltage on the sensor's OUT pin drops to the low level (the sensor detects an edge), the normal execution of the program will be stopped and the function abyssDetected() will be activated.
Of course, it would be nicer to make all this code a part of the AI class, but some technical specifics make such implementation a bit complicated. The interrupt handler must be a function which accepts no parameters. At the same time - all methods of the C++ classes receive "invisible" parameter which is a reference to the object instance - this screws up everything. There are some workarounds, but… Well, never mind. Our code is simple and it works - so don't worry about all this stuff.The only thing the interrupt handler does - it notifies the AI module that there is some danger in front of the robot. We can implement something more urgent and dramatic if needed - but just a notification is enough for now.
void abyssDetected() {
      // triggered when table edge or other abyss is detected
      robotAI->abyssDetectedFlag = true;
}
Right in the next cycle, AI will stop the robot and then start thinking what to do next (RobotAI.cpp).
void RobotAI::processTask() {
    // this is an emergency - surface edge or other abyss detected
    if (abyssDetectedFlag) {
        // do nothing if AI is already busy handling the abyss detection
        if(!abyssDetectedProcessing) {
            // check if the sensors really can't see the floor
            if(robotDistanceSensor->getFrontAbyssDetected()) {
                // stop the engines!
                robotMotors->fullStop();
                // beep the scared sound
                robotVoice->queueSound(sndScared);
                // engage the abyss handling mode
                abyssDetectedProcessing = true;
            }
        }
        abyssDetectedFlag = false;
    }
...
This part of the code works as a safeguard in all AI modes.
In the "scenario" or "remote control" mode it does not allow the robot to move forward if there is a deep hole in front of it. It is up to the operator what to do next.
In the "free wandering" mode AI takes care about what to do next. Seeing an abyss in front, AI crawls back for 900 milliseconds and then decides where to turn as if it faced a wall or other obstacle. Most probably robot will turn left or right and successfully avoid approaching the abyss again.
if(abyssDetectedProcessing) {
    // crawl back for 900 milliseconds
    robotMotors->driveBackward(MOTOR_DRIVE_SPEED, 900);

    // wait one second (with the 100 ms reserve)
    // until the crawling is finished
    scheduleTimedTask(1000);

    // act as we just faced some obstacle
    // measure the distances,
    // and decide the direction to turn to
    currentAIState = stateAI_QueryDistances;
}
...
The resulting behavior looks like the following:
Wandering around - version 2
With the new sensors array wandering around the room is an easy task. All the sensors-specific code was moved to the sensors handling module: RobotDistanceSensor.h.The AI module just asks "Is there any obstacle in front?" (calls isObstacleInFront()). If yes - AI asks the next question "where is the obstacle?" (calls getObstacleDirection()). Knowing where it is - AI can easily decide how to deal with the obstacle.
Please pay attention that the sensors module is not always ready to answer precisely where is the obstacle and how far it is. It takes some time to rotate the ultrasonic sensor and read the side distances. So sometimes the sensor calls can return "unknown" status. In such cases, AI module should cease any actions and wait a bit until the sensors will finish all the measurements. We wait for 3 seconds since we are not in hurry. But the waiting period can be shortened if needed.
The AI code is a bit bulky, but still - pretty straightforward. We are not going to explain it here. Instead, let's have a look at the sensors module method - getObstacleDirection(). This is a core part which is crucial for all AI decisions.
// This method returns codes, specifying the location of the obstacle
// odLEFT - the obstacle is to the left
// odRIGHT - the obstacle is to the right
// odBOTH - there are obstacles both to the left and to the right
// odNONE - no obstacles detected
// odUNKNOWN - unknown, the sensors still need some time
ObstacleDirections RobotDistanceSensor::getObstacleDirection() {
    // first - let's check the abyss sensors
    // this information has the highest priority
    bool leftFlag = getFrontLeftAbyssDetected();
    bool rightFlag = getFrontRightAbyssDetected();
    if(leftFlag) {
        if(rightFlag) {
            return odBOTH;
        } else {
            return odLEFT;
        }
    } else {
        if(rightFlag) {
            return odRIGHT;
        }
    }
    // reaching this point means
    // no abyss was detected on the previous step
    // let's check the front obstacle detecting sensors
    leftFlag = getFrontLeftIRDetected();
    rightFlag = getFrontRightIRDetected();
    if(leftFlag) {
        if(rightFlag) {
            return odBOTH;
        } else {
            return odLEFT;
        }
    } else {
        if(rightFlag) {
            return odRIGHT;
        }
    }
    // reaching this point means
    // none of the IR sensors detected any dangers
    // let's query the Ultrasonic sensor then
    // this may take some time, but it worth it
    if((lastFLDistance == -1) || (lastFRDistance ==-1)) {
        // the side distance measurements are not ready yet
        // need to wait a bit more
        return odUNKNOWN;
    } else {
        if(lastFLDistance == lastFRDistance) {
            return odBOTH;
        } else {
            if(lastFLDistance < lastFRDistance) {
                return odLEFT;
            } else {
                return odRIGHT;
            }
        }
    }
    // reaching this point means
    // none of the sensors detected any dangers
    // the road is free
    return odNONE;
}
The last change to the code worth mentioning is adjusting the way robot turns to pass by the obstacle. Initially, we were using a quick turn, running both tracks in the opposite directions. So the code to turn right looked like the following:
// turning right - aggressive style
// left track goes forward, right track goes backward
runDrives(speed, duration, FORWARD, BACKWARD);
The robot was attacking the obstacle too aggressively, often slamming into it.
Now we use a safer method, stopping one track and running the other backward. Thus the robot keeps the distance and gently crawls back when it detects something on the way:
// turning right - defensive style
// left track stops, right track goes backward
runDrives(speed, duration, RELEASE, BACKWARD);
Conclusions
With the additional infrared sensors and the updated AI, the robot is now more civilized. It does not hit the obstacles as before and overall looks like a quite intelligent being.Of course, current AI is not strong enough to deal with the complicated environments. The robot can get stuck even in simple situations, falling the victim of the weak algorithm. But what we saw was enough to realize - there is no fun in wandering around the room randomly. We need to find a purpose. Some reason for the robot to do this. Maybe bring a can of beer from the fridge, or at least learn the surroundings and find the shortest route on the map.
Modern robots can deal with lots of fancy things - image, sound and voice recognition, neural network-based learning, complicated navigation. We are not there yet - but we've got a good platform to start with.


No comments:
Post a Comment